How To Add Text Along a Path In GIMP {Curved}
How to curve text in GIMP? Check out the above tutorial to see how easy it is to do.
In this GIMP tutorial, I'll show you how to add text along a path!
You'll start off by creating a path with your pen tool. If you've never used the Pen tool… no worries. I'll show you how easy it is to use.
Once you have your Path, I'll show you how to add your text to it.
You'll find all six steps below. If you prefer, check out the Youtube tutorial above to see how it's done.
Step 1: Create a New Document
Here are the dimensions I'm using; 1920 x 1080 @ 300 ppi.
Pro Tip:
Why a resolution of 300 ppi? The reason is GIMP, unlike Photoshop, is 100% raster-based software (i.e., pixel-based).
The text, in GIMP, will have sharper details at a higher resolution.
Even if I'm working on a design project that will be mostly for online use, I will still use a resolution of 300.
Then, when I'm ready to post online, I will resize the canvas to a resolution of 72 ppi.
Step 2: Create a Gradient Background
To spice up our design, let's add a color gradient for the background. The first thing I do is to select the two colors for it. Here are the two colors I've chosen…
Those numbers are known as the Hexidecimal numbers that represent specific colors. Type in the info next to the HTML Notation box (without the hashtag).
To add the gradient, you'll need to grab your Gradient tool. This can be found on the toolbar or by using the keyboard shortcut: "G."
Before using the gradient tool, let's set up the options for it and make adjustments in the tool options. Navigate to the Gradient panel and select FG to BG (RGB).
If the Gradient panel isn't visible…
Windows > Dockable Dialogs > Gradients
For this design, I went with a Radial Gradient. To achieve this, you'll need to select "Radial" as the shape… in the tool options.
The other thing I'd like to do is have the radial start in the center of the document. You could try and "eyeball" it, but chances are it won't be directly in the center.
Finding the dead center of your canvas is easy by adding a vertical and horizontal guide. Where they intersect will be in the middle of your doc. Let's add the guides. Here's how…
Image > Guides > New Guide (by Percent)
Create a horizontal and vertical guide at 50%. If the guides aren't visible…
View > Show Guides
Now that you know where the center is click where the guides intersect and drag out. The longer the line, the softer the transition from one color to the other. A shorter line will have a harder edge, and the first color will be much smaller.
If you're unhappy with the gradient, you can redo it, and it will replace the first.
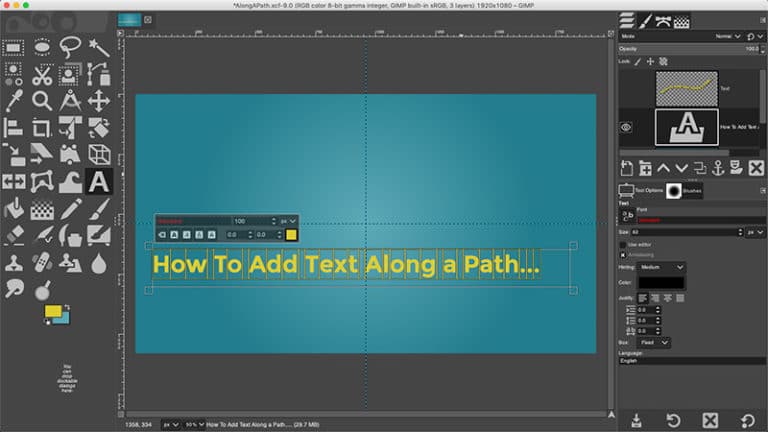
Let's grab your text tool with the letter "T." Now, add our text via the text box.
My chosen font for this project is Montserrat Heavy. This is a free font I found from Font Squirrel. Either download, install, and use or select any font of your choice.
For the font size and font color I went with: 100 + #b2bf34.
Feel free to type out anything you want. For this project, I added the following; "How To Add Text Along a Path."
Step 4: Create a Path For Your Text
Next up is creating our Path for the text. Grab the Paths tool from your toolbar or hit the letter "E."
I'm going to start my Path tool on the left side of the canvas by clicking on it once. This creates an anchor point.
To make a Path, you'll need to add another anchor point. But, before you do, instead of clicking, click and hold down your mouse button and drag out.
This will create a curved path vs. a linear path. You also have two handles attached to the new anchor point. You can grab these handles and use them to change the shape of the curve.
Continue adding more anchor points (to the right) and bend the curve accordingly. Do this until you reach the end of your canvas.
Step 5: Add Your Text to the Path
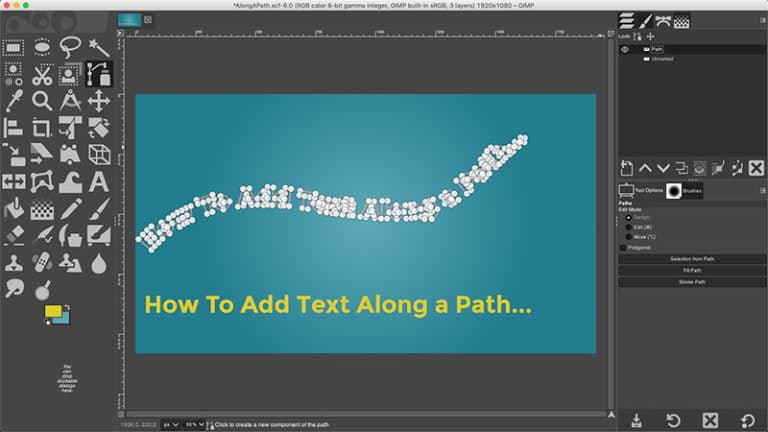
Now, the question is, how do we get our text on the Path? It's relatively easy to do! Right-click on your text layer and select "Text Along a Path."
Boom! Your text is now on the Path. Or is it? Also, it's not so pretty, is it?
All those little circles represent different points of the Path… in the shape of your letters. You could, if you wanted to, click and drag the circles to re-shape your letters.
At this point, your text is not really on the Path. So far, we've created a path for each letter. Now, we need to fill in this new Path with a color of our choosing.
I'm going to use the same yellow color as before. You'll also need to create a new layer to hold the pixels/color of your text. Either click on the new layer icon at the bottom of the Layers panel or use…
Make sure you set the color ("Fill with:") of your new layer to "Transparency."
Next, let's convert the Path to a selection that will be used to fill in your color. Navigate to the tool options and click on the "Selection from Path" button.
To fill in the letters, find your Bucket Fill tool (Shift + B) and click inside any letter selection. Presto! You now have your text along path.
The final step is to deselect with Command (Mac) or Control (PC) + D.
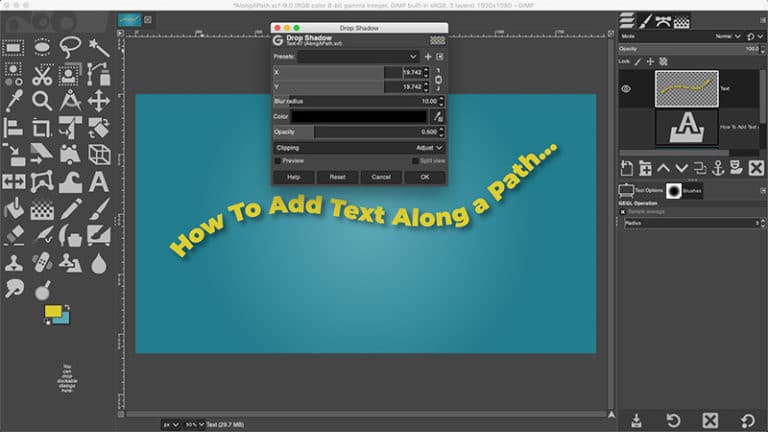
Step 6: Style Your Text With a Drop Shadow
To finish up my design, I added a drop shadow. This is also easy to do in GIMP via the filter options.
Filters > Light and Shadow > Drop Shadow
Style your shadow according to your creative vision!
Like this article? If so, please share!
hernandezferpulthy1992.blogspot.com
Source: https://parkerphotographic.com/how-to-create-text-along-a-path-in-gimp/


0 Response to "Gimp How to Continue a Path"
Post a Comment